Now that REBOOT has released, I’m gearing up to perform these songs live. One of my goals it to make the performances more visually interesting, help the audience connect with what I’m doing musically, and not spend an entire set hunched over a laptop.
I just added a Tenori-On White to my rig to help achieve this goal and to use as a controller and sequencer for composition. In this post I’ll offer some first impressions and notes on use.
Favorite Features
- Built-in Synth engine, integrated sequencer, built-in speakers and SD card for composition and performance on the go
- Runs on batteries
- You can use it as a MIDI controller
- Fantastic user interface and work flow
- Visual representation of music
- Ability to load 48 samples allowing you expand the palette when you are not using it as a controller
First Impressions on Design  I was actually surprised when I unboxed the Tenori-On. The unit was like 20% smaller than I thought it would be after seeing it in picture and videos – and that’s a good thing. Tenori-On is clearly designed to be held with both hands using the thumbs and fingers to access function buttons plus reach inside to hit "LED" buttons. This being the case the small buttons allow for a smaller matrix so you can access a more with thumbs and fingers on either hand. The case is made of metal and machined by robots. All the controls are flush even with the rounded contours – very nice!
LED Buttons
One of the main reasons I got Tenori-On White was because the LED lights are visible on the front and the back. So when you play, the audience sees the lights as well. This feature is unique to Tenori-On white.
Learning Curve
Tenori-On is a proprietary system and the navigation and functionality is pre-configured. One advantage of pre-configured control schemes like the APC-40 (assuming you don't remap) and Tenori-On is that the learning curve is quite short. With both of these products time from setup to being productive and creative was extremely short for me.
In Use
Tenori-On is simply a blast to play. Beginners will be able to get something musical going right away. Advanced users who spend the time to “transcend” the navigation system will be able to create interesting musical and visual performances as well as use the Tenori-On as a sequencer and controller.
Of course like with any instrument, practice is what’s going to make this a great performance tool. In only about an hour I had 80% of the features memorized. In about 3 hours I was navigating layers, blocks, modes, and tweaking parameters in real-time without looking at the function buttons.
Using Your Own Samples and Storing Data
Using a free Windows/Mac utility, you can build three customs instruments with up to 16 samples each. Each sample is limited to 900ms and you can’t edit much. Even though it’s no replacement for your sampler, it’s enough to allow you to transform the Tenori-On’s pallet support your needs. Revision… Samples, songs, blocks, layers can be saved and loaded from an SD card. Sample memory is non-volatile so samples remain in memory even if you turn the unit off and back on again! That is good news since it takes about 3 minutes to load 1 user voice containing 16 samples. You definitely will want to get your samples all installed before you perform – either that or you’ll need a Tenori-On roadie :^).
In Use As a Controller with Ableton Live 
You can go way beyond the built-in sound set plus add some visual sizzle to your performance by using Tenori-On as a MIDI controller. The picture above is of the Tenori-On and my laptop running Ableton Live 8. The Tenori-On is in slave mode and Ableton is the Master clock. I’m using the MIDI ports on my Novation NIO Sound card to connect the Tenori-On to Ableton.
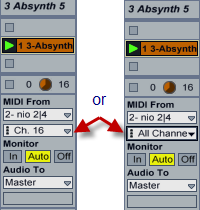
Each of the 16 layers within the Tenori-On transmit on a different MIDI channel. I created tracks with instances of Gladiator 2, Alchemy, Sylenth1, and Absynth 5 each listening on a different MIDI track number.
By default different performance modes (Score , Random, Draw, Push, Solo) are hard-coded to each layer. There is a “hack” to override this (see links at bottom of post).
In my test set, I used Solo Mode to sequence a bass line into a MIDI clip in a Gladiator 2 track. The above picture illustrates my use of Draw Mode to play some awesome motion pads in Absynth 5. Push Mode is also great for synths like Alchemy and Absynth.
In some cases I wanted to switch modes and record all note data into one MIDI clip. When going this route set the track MIDI input to “All Channels”.
Sync
I’ve read that some people have has issues syncing with DAW’s. It must be true as there is a firmware update coming to improve sync. In my limited use I’ve not had much trouble and it works just fine. My guess is those having trouble are pumping out lots of data from multiple layers.
Price and Tenori-On Orange
Tenori-On White has been out for a few years. The price has slowly dropped and it goes for $999 today. Yamaha recently announced Tenori-On Orange for $699 with availability in January. To get the price down they changed the case to plastic, took the LEDs of the back and took away the battery power capability. All other features are the same. Of course these are some of my favorite features for White was a clear choice for me.
Where these the right choices? Are these prices too high? There are lots of discussion about this on sites like Synthtopia and Create Digital Music. While I would loved to have paid less, I don’t regret the purchase at all.
Conclusion
So far, the Tenori-On has exceeded all my expectations. Once I got it out the box I found it hard to put down. I’m enjoying using it as an alternative to my computer and for making music on the go. Using it as a controller definitely boosts my creativity. It’s unique features make it a it a nice compliment to my ACP 40.
Links:
- Yamaha Tenori-On Global Site
- Tenori-On USA
- Wikipedia Article
- Downloads: User Voice Manager, Manuals, MP3 Demos, Voice Banks
- Setting advanced mode (caution, not sure what will happen to this mode after the firmware update)
- Tenori-On Orange announcement plus information on upcoming January 2010 upgrade which ads features and improves sync
Mark Mosher
Electronic Music Artist, Composer, Sound Designer
Louisville/Denver/Boulder
http://www.modulatethis.com
http://www.markmoshermusic.com
http://www.twitter.com/markmosher


Leave a Comment